Saturday, April 30, 2011

Hot Pepper Cook-off Challenge and Chuck Hughes' SUPER BURGER!

I was recently nominated to be one of the final three contenders in the Canadian Food Network Community's cook-off challenge, hosted by none other than our hometown chef Chuck Hughes of Garde Manger restaurant, and who, you might recall, won the battle against Bobby Flay on Iron Chef.  My competitors, community friends from the site, are "Ava DJ" and "Alley B". I couldn't be in better company for the coveted Hot Pepper award. Our cook-off challenge was determined by the outcome of community members' votes  which  chose Chuck's "Super Burger" recipe. Our entries were submitted and posted, now all that is left is for you to visit the site and vote for the next Hot Pepper  winner. You have until May 11th to vote by simply clicking the Hot Pepper link. The recipe for the burgers and homemade ranch dressing can be found by clicking: Chuck's Super Burgers. I went the extra mile for the challenge by making my own hamburger buns from the trusted Canadian Living recipes, and which I highly recommend. 

Chuck’s restaurant, Garde Manger  located in Old Montreal.


Chuck's staff ...ready with a smile and encouragement when I visited, scouting for tips.


This being a labour of love, I turned to some of my favourite shops to ensure the best ingredients,Viandal a family run butcher shop was a must not only for the meat needed for the recipe, but also for the warm greeting you get as you enter the door. After all, the challenge isn't just about winning so...
Merci, Bernard for your fine meat products, your sunny disposition and good wishes as I embarked on this fun challenge.
I turned to Quebec Smoked Meat Products Co. at 1889 Centre, Montreal for the best bacon around.
 

Local raclette cheese (similar to gruyère) from Fromagerie Fritz Kaiser ( Noyan,Quebec) was used in the burgers and for the topping.


Homemade ranch dressing was a must for Chuck's super burgers...


and of course no store bought buns for theses babies....my homemade buns from Canadian Living
recipes


Friday, April 29, 2011

Tortiglioni with Portobello Mushrooms and Prosciutto

Tortiglioni is a spirally formed tubular pasta, similar to rigatoni but narrower in width with its ridges spiraling around the tube. I find that the pasta's thicker walls hold up even better than rigatoni, especially for baked pasta dishes. The pasta also works well with thick meaty sauces, the perfect match for the portobello and prosciutto tomato sauce I had in mind. Speaking of the sauce, the whole idea came about when I remembered the prosciutto I had frozen, which by the way, was my attempt  to save it before its expiry date ran out. You might not want to use thawed prosciutto that has been frozen as part of your antipasto, but cooked in a basic tomato sauce no one will be the wiser.

Ingredients:
1/2 lb Rigatoni pasta (250 grams)
3 tablespoons extra virgin olive oil
1 small onion chopped
1 garlic finely chopped
1/2 carrot finely chopped
1 small celery stalk finely chopped
1 1/2 tablespoons tomato paste
1/2 cup dry red wine
14 oz San Marzano tomatoes
2 portobello mushrooms
salt
1/4 lb. Parma prosciutto
grated parmesan cheese (if desired)

While the salted water is boiling for the pasta which will take at least 12 minutes to cook, start preparing the sauce. 
In a sauce pan on medium high heat, heat the oil and saute the onions and garlic until translucent. Add the finely chopped carrot and celery and continue cooking  for 2-3 minutes until soft. Season the vegetables with salt, being careful not to over season as the prosciutto will tend to be salty.


Meanwhile, with a damp cloth clean the tops of the mushrooms. Turn the mushrooms over and using a spoon gently remove the gills.Cut into 1/4 inch slices.


Add the sliced mushrooms to the pan and cook for 2-3 minutes before adding the prosciutto pieces. Continue cooking for a minute or two


Stir in  the tomato pasta and the wine. Continue cooking to allow the flavours to infuse and wine to reduce, about 2 minutes. Add the tomatoes and simmer for at least 10-15 minutes
.


Toss in the drained cooked pasta
Grate fresh parmesan cheese, if desired and serve.


Monday, April 18, 2011

Halibut with Julienned Vegetables and Sundried Tomatoes


Yup another fish recipe, thanks to "Lenten Friday with Zenie".  That of course would be my mom , known to small children as Zenie......I guess a lot easier than saying Zelinda. Luckily, I had just bought the most beautiful piece of halibut and was thrilled to find out that my mom would be joining us for dinner. No last minute substitute this time around.....remember Wednesday's tuna croquettes? Although super easy to prepare, the halibut served with julienne vegetables and an asparagus saffron risotto could grace any fine restaurant menu. Hope you give it a try. 


Ingredients:
1 lb halibut cut into four serving portions
3 tablespoons light olive oil
2 tablespoons butter
salt and pepper
1 zucchini 
1 yellow sweet pepper
1/2 shallots finely chopped
4-5 sun-dried tomatoes finely sliced
large capers (2 per serving)
1/4 cup of brandy

Pre-heat the oven to 375º F.  Cut  the vegetables and chop the shallots into julienne cut(thin long strips). Set aside. Season the halibut with salt and pepper. Heat the oil and butter on medium-high heat. The oil and butter should sizzle once you place the fish in the pan. Sear the fish well, about 2-3 minutes. Once the fish has formed a brown crust and releases easily with a spatula, turn to brown on the other side. Turn only once. If there is excess fat, transfer a tablespoon to a separate frying pan in which you will saute the vegetables. Remove the pan from the heat. Transfer to the oven where it will continue to cook for about ten minutes, depending on the thickness of the halibut.

While the fish finishes cooking begin sauteing the vegetables. Add a tablespoon each of butter and light olive oil to the oil already in the pan. Heat on medium high heat. Add the shallots and saute for 2 minutes. Toss in the peppers, zucchini, capers, sun-dried tomatoes. Cook for a minute before adding the
brandy.
Continue cooking to allow the brandy to reduce and flavours to infuse. Serve on the baked fish. Makes 4 portions.
.

Saturday, April 16, 2011

Celeriac Salad (Remoulade) with Maple Dijon Vinaigrette


 Celeriac (celery root) is a large bulbous root vegetable with very little starch content. Excellent  for soups, mashed and in salads, it has a delicate celery taste. My favourite way of serving it is usually in a simple salad form, also known as "remoulade". In line with the  season, I decided to add some maple syrup to the vinaigrette. The sweetness of the maple syrup helps balance the acidity of the cider vinegar used in the recipe.


Vinaigrette:
Ingredients:
1/4 cup cider vinegar
1/4 mayonnaise
1 teaspoon Dijon cognac mustard
1 heaping teaspoon L'Ancienne Dijon mustard (with seeds)
2 tablespoons maple syrup
3/4 light olive oil
salt and pepper to taste

In a food processor or by hand whisk all the ingredients except the oil. Once the ingredients are blended gradually whisk in the oil in a slow steady stream.

Celeriac
2 lbs. celeriac/ 8 cups shredded

With a knife cut away knobby end and tough peel 

Cut into pieces small enough for the feed tube of a food processor and shred

Fry Free Zone.....Tuna Fish Croquettes


This recipe really came about at the last minute when my mom reminded me that she had decided on two days of  abstinence from meat during Lent.....not only Friday but Wednesday as well. With chicken broth simmering, and no fish on hand the only quick solution was canned tuna from the pantry. Tuna croquettes came to mind as the perfect protein substitute. I used white albacore canned tuna, which I feel is worth the extra cost. Packed in water, it is chunky, truly meaty and light in flavour. No wonder poor Jessica Simpson was perplexed while eating this "chicken of the sea"; wondering whether she was really eating chicken or fish. ......anyway back to the recipe. Although mom hasn't made these in years, I relied on her basic recipe  which calls for garlic, eggs,  fine breadcrumbs and lots of Italian parsley.  The only thing left was to give the croquettes some colour  and extra flavour by adding cherry tomatoes and  shallots. Also, instead of frying the croquettes, I sent them into the "no fry zone" using  panko breadcrumbs drizzled with a bit of olive oil to give me all the crispiness but none of the saturated fats. Served with a creamy celeriac salad and maple Dijon vinaigrette (again a homage to our maple sugar season), it proved a winner and got my mom's seal of approval. 
 Suggestions: Drain the tuna well. Gently form the croquettes and again gently roll into the panko breadcrumbs as the mixture tends to be moist. Regardless, they hold well while baking and should not fall apart.

Ingredients:
2- 7oz. cans white albacore solid white tuna
1/2 shallot finely chopped
1 garlic clove finely chopped
5-6 finely chopped cherry tomatoes
1/4 cup finely chopped Italian parsley
2 eggs well beaten
1/2 cup fine breadcrumbs
2  teaspoons light olive oil
panko breadcrumbs for coating
1 teaspoon Spanish smoked paprika

Drain the tuna. Transfer to a bowl and flake into pieces with your hands. With a fork mix in the beaten eggs, garlic, shallots, tomatoes, parsley, 2 tsp olive oil, bread crumbs. Season with salt and pepper.

Take a large spoonful of the tuna mixture and form into a quenelle or flat football shape


In a bowl blend the panko breadcrumbs, smoked paprika and season with salt. Coat gently each croquette with the seasoned panko breadcrumbs and transfer to a baking tray which has been lined with a lightly oiled sheet of parchment paper:


Drizzle some light olive oil  on each croquette. Bake in a preheated 375 F oven for ten minutes until golden. Remove from the oven and turn the croquettes onto the other side. Continue baking for an additional 10 minutes until the tops are golden. Makes 8


Tuesday, April 12, 2011

Orecchiette with Rapini ( brocoletti di rape)

 My mom's rapini with fried garlic recipe was one of my first posts. It was a vegetable I grew up eating, and which to this day remains my family's favourite. I took some liberty with my mom's basic recipe by adding fresh tomatoes and white wine to the rapini before tossing in orecchiette pasta, which literally means "little ears".
For additional photos illustrating the preparation of the rapini I invite you to visit my March 10, 2010 post


Orecchiette Pasta....pronounced: oh-rech-ee-Et-tay


Ingredients:
250 grams/ 1/2 lb.orecchiette pasta
1 bunch rapini
4 tablespoons extra virgin oil
3-4 garlic cloves sliced
1/4 tsp chili flakes or more if desired
2 cups  cherry tomatoes cut into wedges
1/2 cup white wine
salt to taste
grated pecorino or parmesan cheese

 In a large pot boil enough salted water (6-8 cups) to cook the pasta al dente (11 minutes or according to pkg. instructions). Drain before adding to the prepared rapini.

While the water is boiling for the pasta start prepping the rapini. Begin by washing the rapini and cutting about an 1 inch off the stem. To allow for more even cooking with a knife, split about 1-2 inches down the center of the lower part of the rapini stem. This allows for more even cooking  Wash the rapini under cold water and drain. Fill a large pot with water and bring to a boil. I add salt to the boiling water as you would do, when cooking pasta. 

Drop the rapini in the salted boiling water and cook for about 1-2 minutes until "a la dente".

Remove the rapini from the boiling water and place  immediately in a large bowl filled with ice water (this will stop the cooking process and help retain the deep green colour of the rapini).

Strain and remove the excess water by wringing the rapini with your hands

Cut into 3 pieces and set aside.

In a frying pan heat the oil and add the garlic slices and red chili flakes. Saute the garlic until a golden colour.

Add the rapini, away from the sizzling oil as it tends to splatter, and continue cooking on medium heat  to infuse the flavours, for about 1 to 2 minutes.

Toss in the  tomatoes and continue cooking an additional minute.


.
Add the wine and simmer for until reduced about 3 minutes.

Toss in the cooked pasta and grated parmesan or pecorino cheese


Serve with extra grated parmesan or pecorino cheese and a drizzle of good extra virgin olive oil.  Serves 2-4


Friday, April 8, 2011

Maple Apple and Cherry Upside Down Cake


We 're really quite spoiled in Quebec with over 13,500 maple producers who give us high quality syrup with no colouring or additives. That translates to 85% of the world's maple syrup production or 93% of  Canada's total production. No wonder it is such an integral part of the province's culture. Amazing, when you think that the sugaring season is so short, between 6-8 weeks, ending at the end of April. Also, did you know that it takes 40 gallons of maple sap to produce 1 gallon of maple syrup?  Now you know why I like to refer it to liquid gold

So while the maple sugar harvest is still in full swing, I would like to share this easy to put together upside down cake recipe in celebration of this fine ingredient which epitomizes the arrival of spring in our region.  I  paired the apples with dried cherries and roasted pecans, ingredients that I think marry so well with the rich flavours of the star ingredient. If maple syrup is not available in your area, simply substitute 1/4 cup of brown sugar for the cake batter and 3/4 cup for the luscious topping. 


Ingredients:
Topping:

1/4 cup butter

1/2 cup maple syrup
3-4 apples peeled and sliced (1/4" thick)
1/2 cup dried cherries
1/2 cup roasted pecans whole or large pieces


Add the maple syrup and butter to a 9"cake pan. Heat in a 350ºF oven until the butter is melted and bubbly. Remove from the oven. Add the apples, dried cherries and pecans and toss to cover with the butter/maple syrup mixture. Spread the fruit evenly on the bottom of the pan and set aside.


Batter:


1/4 cup soft butter
1/4 cup brown sugar
1/2 cup maple syrup
1 egg well beaten
1 1/2 cup all purpose flour
1 teaspoon baking powder
1/2 teaspoon baking soda
1/2 teaspoon salt
1/2 cup milk + 1 teaspoon cider vinegar 

With a wooden spoon beat the brown sugar gradually into the butter until light. Blend in the beaten egg and maple syrup. In a separate bowl, whisk the flour, baking powder, baking soda and salt together to blend. Stir the dry ingredients into the egg butter mixture alternately with the sour milk ( 3additions of dry ingredients and 2 additions of milk) ending with the flour. Pour into the 9"inch cake pan which has been prepared with the fruit, nut and maple syrup. Spread the batter  over the fruit mixture. Bake for in a pre-heated 350º F oven for 45 minutes. Remove from the oven and allow to cool for 5-10 minutes. Invert a serving plate onto the cake pan and turn over.  Gently lift off the pan. Serve warm; plain or with a touch of whipping cream.
.

Wednesday, April 6, 2011

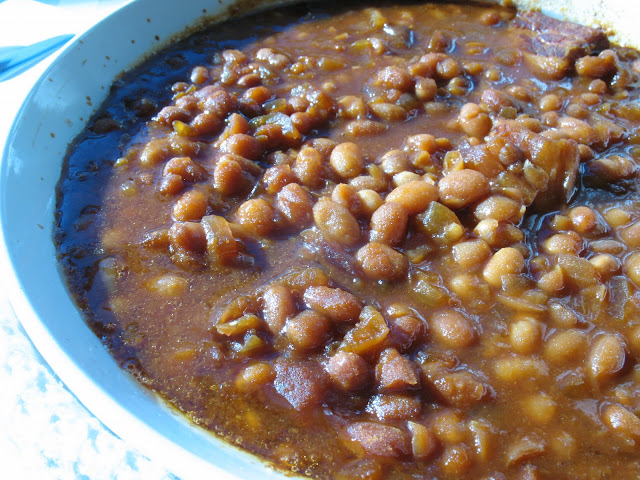
Fèves au Lard/Baked Beans

Fèves au lard (baked beans), a traditional peasant food was a staple for pioneers and "coureurs des bois" (trappers and fur traders). Today it is still savoured as a breakfast side dish with bacon and eggs. It is also the quintessential part of any sugaring-off menu found in "cabanes à sucre", where many Quebecois families choose to celebrate not only the arrival of spring but also Easter. Packed with protein and fiber, I'm sure you will get hooked on this humble healthy dish with it's satiny sauce and hint of sweet maple syrup.  If not available, the maple syrup can be replaced by brown sugar. Here's my version of baked beans made with salted pork belly, molasses and our region's liquid gold.....maple syrup. 


Ingredients:
1 pound dried navy beans soaked overnight
5 cups cold water
1/2 pound salted pork belly cut into 1" pieces
1 onion chopped
2 teaspoon cider vinegar 
1/2 cup ketchup
1/2 cup dark molasses
1/4 cup maple syrup
1 teaspoon dry mustard
1 teaspoon salt 


Strain and rinse the beans. Add the beans to a pot with 5 cups of water. Boil for thirty minutes. Transfer the beans and water to an ovenproof casserole. Stir in the remaining ingredients.  Cover and bake in a 250ºF oven for 7-8 hours.