Saturday, January 15, 2011

Rustic Artisanal No-knead Bread


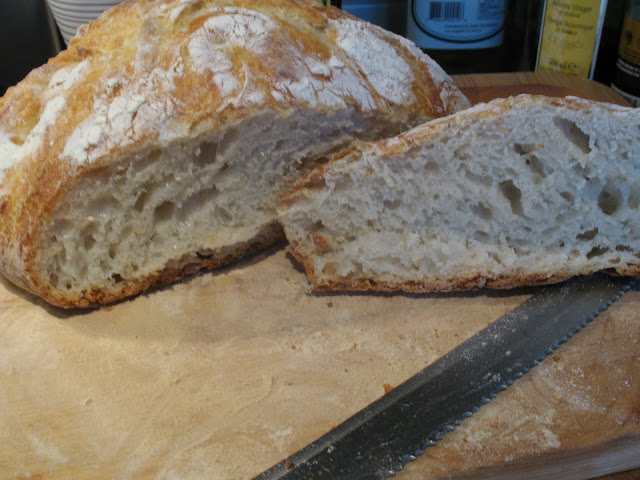
Nothing is more inviting than the scent of bread baking in the oven, especially when you come in from the cold during these chilly winter months. I'm sure there are plenty of would be bread makers out there, still too afraid to go anywhere near yeast. Well fear no more, this recipe is quick to prepare and almost impossible to mess up.  There is no need to proof the yeast, nor is there any kneading involved. The only thing this recipe takes is plenty of patience to allow the yeast to do its magic.  Believe it or not, it actually takes at least twelve hours for the dough to rise, so it does require some planning ahead, but that's about it. While the dough is rising to its wonderful glory get a good night's sleep because the very the next day, you will be ready to bake some of the best country bread you've ever tasted!  My mom reminded me that back in her day they would always start the dough the night before, and then the next day bring it to the village oven for baking. Today unfortunately, we can't rely on communal wood burning ovens, but can obtain the same wonderful crust by baking it at a very high temperature in an enameled cast iron Dutch oven with a cover.  Even if you're an old hand at making bread, I'm sure you will love trying out this recipe. I can tell you from experience that I now think twice about buying a loaf of bread from the bakers even though Montreal has some of the best bread.
For those of you familiar with my blog, you will notice that I'm still using the same an adapted recipe posted in March 2010,  from the New York Times by Jim Lahey of the Sullivan Street Bakery in New York. The only changes I made were to slightly reduce the amount of water, add a touch more salt, and lower the oven temperature for the last part of the baking.  The updated post also has more detailed photos of the whole bread making process to better guide you.

Suggestions: 
                    You can also alter the recipe to make whole wheat bread by using 1/2 all purpose flour and 1/2 whole wheat flour
                      The recipe also make great focaccia by adding 3 tablespoons of light extra virgin olive oil to the original recipe and baking as you would a pizza


Ingredients:
3 cups all purpose flour
1/4 teaspoon dry yeast
1 1/2 teaspoon salt
1 1/2 cup water

METHOD

In a mixing bowl add the flour, the yeast and the salt. Using your hands or a wooden spoon, blend the dry ingredients.


Pour in 1 1/2 cup of water and mix. Pull together the dough using your hands or a wooden spoon. 


Scrape any excess flour from the bottom and sides of the bowl, making sure the ingredients are well incorporated and form into a ball.  The dough will have a stringy texture.


Place a piece of plastic wrap on the bowl to avoid the dough from drying out. Allow to rise in a warm dry, and draft free place for at least 12 hours and up to 24 hours. The photo to the right is dough that has risen overnight.


Dust a large piece of parchment paper, measuring about 24 inches with flour to prevent the dough from sticking during its second rising. Scrape the risen dough onto the floured parchment paper.


Sprinkle some flour on the dough to prevent it from sticking to your hands


Lightly pat down the dough with your hands to form a piece of dough measuring approximately 10x10 inches


      Fold the both side edges to the center of the dough.take the top edge and fold into the center, doing the same with the bottom edge of the dough


 Turn the dough and place the folded side of the dough on the parchment paper and dust with flour to prevent sticking
 Loosely wrap the dough in the parchment paper and place  on a baking sheet. Cover with a tea towel

Transfer to a warm and dry place and allow to rise a second time for 2 hours.


Place the cast iron Dutch oven with its cover, on the second rack from the bottom of your stove's oven.   Preheat the oven to 500ºF .  Dust the smooth side of the risen dough with flower to prevent it from sticking to the bottom while baking.


Once the oven reaches the required temperature.  Remove the pot from the oven and take the cover off. Place the dough, folded sides up and cover. Bake for 30 minutes at 500ºF


Remove the cover and continue baking at 375º F an additional 15-30 minutes.


Fully baked bread following an additional 15 minutes of baking at 375ºF, for a darker loaf  bake longer


Any thoughts on the recipe posts? I would love to see your comments and suggestions. It's always fun to connect.

Wednesday, January 12, 2011

General Tao Tofu

My tofu recipe marathon continues as I try to use up the extra tofu sitting in my fridge. The only question....... what to make in order to elevate our tasteless rubbery friend to new heights and knock your socks off? In fact, I literally did that to my poor husband who found the recipe a bit too spicy for his liking but still delicious. In the mood for something Asian flavoured, I decided to adapt Ricardo's (Food Network Canada celebrity chef) recipe for General Tao chicken wings for my purpose. It is a dish that I made in the past, using less than the recommended sambal oelek to accommodate more delicate palates.  What had sold me on his recipe was the fact that the chicken wings were baked and not fried. However in altering the main ingredient used, I decided to throw caution to the wind by frying the tofu in a cornstarch/flour mixture. In spite of my husband's complaints regarding the spiciness of the dish, I think the recipe turned out amazingly delicious with just the right amount of heat. Just ask my favourite neighbours who got a plate of the General Tao tofu.
Suggestions: The recipe serves four but can be reduced by using less tofu but using the same amount of sauce. This will give you a more generous coating for the tofu. 
Do reduce the amount of sambal oelek (chili sauce) to 1/4 or 1/2 teaspoon for a less spicy dish.
To simplify the recipe I used my trusty Cuisinart to chop the garlic and ginger. I then added the remaining ingredients indicated to blend.

Tofu:
20 ounces firm tofu (2 blocks) chopped into 1 inch squares
1/2 cup flour
1/2 cup cornstarch
2 eggs
grape seed oil or vegetable oil for frying

Method:
 Blend the cornstarch and flour in a bowl and dredge the tofu pieces in the mixture. Transfer to a plate
 In a bowl slightly beat 2 eggs. Dip the floured tofu pieces in the beaten eggs
Remove the tofu pieces from the egg mixture and dredge a second time in the cornstarch/ flour mixture


Heat the oil and fry the tofu pieces until golden

Transfer the cooked tofu onto paper towels to absorb any excess oil. Set aside while preparing the General Tao sauce


Sauce:
3 garlic gloves finely chopped
2 tablespoons fresh ginger finely chopped
2 teaspoons sesame oil
3 tablespoons water
1 teaspoon sambal oelek(Chinese chili sauce)
1/2 teaspoon paprika
2 teaspoons cornstarch
3 tablespoons soy sauce
3 tablespoons rice vinegar
3 tablespoons water
1/2 cup sugar
1 thinly sliced green onion for garnish

In a bowl, whisk the cornstarch, soy sauce, sesame oil, rice vinegar, 3 tablespoons water, fresh ginger, garlic, sambal oelek and paprika. Set aside.

If using a processor drop in 3 garlic cloves and about 2" piece of fresh ginger and chop.  
Add the  cornstarch, soy sauce, sesame oil, rice vinegar, 3 tablespoons water, fresh ginger, garlic, sambal oelek and paprika and pulse to blend. Set aside.


In a large skillet bring 3 tablespoons of water and 1/2 cup of sugar to a boil. Do not stir while it is cooking.
Cook until the mixture turns golden
Pour the sauce mixture into the skillet 

Stir and simmer until a syrup consistency. If  the consistency is too thick add a little water(a tablespoon or two) to the sauce.


Toss in the tofu making sure that the pieces are covered with the sauce

Serve with basmati rice and garnish with sliced green onions.

Monday, January 10, 2011

Pesto Chicken and Pasta with Broccoli

Looking for an easy uncomplicated weeknight meal after a long day at work?  Well this is the perfect recipe for you. It will probably take less time than ordering out and won't break the bank; just the right remedy needed especially after all that holiday spending.
All that you will need are chicken breast, pasta, and pesto to prepare this delicious meal in less than thirty minutes. I use frozen pesto from my summer stash but store bought works just fine.  Properly wrapped, frozen pesto will keep all winter long. In fact, I usually have enough on hand to carry me through to spring. Surprisingly it keeps all its fresh summery flavour and vibrant green colour thereby; dispelling the notion that it should only be kept frozen for a month or two month.  Try adding finely chopped pine nuts to the pesto for a nutty richer flavour.  For those of you up for an easy challenge, I'm including my recipe for pesto from an earlier post.


Basil Pesto:


Prepared spoonfuls for freezing.

Basil Pesto
4 cups basil leaves (washed and dried)
1 cup fresh Italian parsley
1 garlic clove
1/4 cup Parmigiano-Reggiano  grated cheese
1/3 cup olive oil
1/2 teaspoon salt

In a food processor chop the garlic.  Add the basil, parsley, grated Parmesan cheese, salt and pulsate.  Slowly add the oil in a constant stream while the food processor is still on, until finely chopped.  Makes 1 cup.  To freeze, place 6 spoonfuls on a tray which has been lined with parchment paper. Once frozen, wrap individually and transfer to freezer bags. Will keep for several months.

  
Pesto Chicken and Pasta with Broccoli

Method:
Step 1:  Smear a generous amount of  pesto on the chicken breast and drizzle some extra virgin oil on top
Step 2: Place it on a baking tray lined with parchment paper and bake in a 375º F oven. Roast until done (about 20 minutes or more, depending on the size of the chicken breast).
  
Step 3:While the chicken breast is roasting, boil some water and cook your favorite pasta .During the last few minutes, drop in some broccoli florets. Before draining the pasta and broccoli, reserve some of the water.
Step 4: Drain the pasta and broccoli.  
Step 5:Toss in the pesto and add a small amount as needed of the reserved water.
Step6: Plate the pasta with sliced pesto chicken breast on top.
Step7:Grate some Reggianno Parmigiano cheese and drizzle with extra virgin olive oil.  Serve. 

Friday, January 7, 2011

Just like Butta Tofu.......with butternut squash and tomato curry sauce

After all the holiday indulgence, I believe our bodies crave less rich foods. On the other hand, it might also be our conscience that has gotten the upper hand, guiding us to healthier eating as the new year takes hold. This recipe is proof that even tofu can be edible and quite tasty, when combined with the right spices. Tofu is like a sponge ( albeit a rubbery one...... as most of you are probably thinking but too polite to say), absorbing the flavours of the other ingredients and especially the rich spices. The butternut pieces not only gives is a lovely buttery flavour but makes for a satisfying dish.


Ingredients:
10 ounces firm tofu, cut into bite size pieces.
2-3 tablespoons olive oil
1/2 onion chopped
1 garlic clove finely chopped
1 tablespoon finely chopped ginger
1 teaspoon cumin
1 teaspoon coriander
1 teaspoon garam masala
1/2 teaspoon turmeric
1 cup butternut squash peeled and cut into small cubes
2 cups cauliflower florets
2 cups tomato pieces
1/2 cup water
1 cup sliced zucchini
salt to taste


Heat the oil and saute the onions , garlic and ginger for about 3 minutes until golden
Stir in the spices and cook for an additional minuteor two
Add the tofu and cook for 2-3 minutes to coat with the spices


Add the butternut squash pieces and cauliflower pieces


Stir in the tomato pieces and pour in 1/2 cup of water

Toss in the zucchini


Season to taste with salt and cover the skillet with a cover. Allow to simmer for about 10 minutes or until the vegetables are cooked.


Wednesday, January 5, 2011

Rapini with Chick Peas and Tomato Sauce

Looking for a healthy and super easy week night meal?

Simply start by making a quick marinara sauce by sauteing in some hot olive oil; one half of a small onion, a finely chopped garlic, and adding half of a finely chopped carrot and celery stick. This will take under five minutes. Add a large can of tomatoes and allow to simmer while preparing the rapini. Season to taste with salt and pepper.

Step two: Cook the rapini as shown below (earlier post on preparing rapini/rape)

Step three: Rinse and drain one can of chick peas. Toss into the rapini which has been sauteed in olive oil and garlic. Cook for a minute or two to allow the flavours to infuse.

Step four: Add  the marinara sauce to the rapini and chick peas mixture. Cook for a minute or two, grate some fresh parmesan cheese on-top, toss and serve hot. Delicious served with homemade foccaccia.(check out the no knead easy bread recipe  which makes great focaccia )

.


Mom's Basic Rapini and Garlic Recipe
1 bunch rapini
4 tablespoons extra virgin oil
3-4 cloves garlic peeled and sliced
1/4 teaspoon dried red chili flakes or more for extra heat
salt to taste

Begin by washing the rapini and cutting about an 1 inch off the stem. To allow for more even cooking with a knife, split about 1-2 inches down the center of the lower part of the rapini stem. This allows for more even cooking. Wash the rapini under cold water and drain. Fill a large pot with water and bring to a boil. I add salt to the boiling water as you would do, when cooking pasta. Drop the rapini in the salted boiling water and cook for about 1 minutes until "a la dente".
Strain the rapini and place it immediately in a large bowl filled with ice water. Strain and remove the excess water by wringing the rapini with your hands or paper towel. Cut into 3 pieces and set aside. In a frying pan heat the oil and add the garlic slices and red chili flakes. Saute the garlic until a golden colour. Add the rapini as shown in the photo, away from the sizzling oil as it tends to splatter, and continue cooking on medium heat to infuse the flavours, for about 1 to 2 minutes. Do not over cook. Season with salt. Serve as a side dish or toss into a hot pasta and tomato sauce dish. So from my family to yours, buon appetito!